Friday, March 19, 2021

Mother's Day for Anything Goes Challenge at Jan's Digi Stamp Challenges

 It is the 15th of the month and that means another challenge on Jan's Digi Stamp Challenges Blog.  Always anything goes means lot of fun and creativity.  Two lucky winners will be awarded a $10 Gift Code to the on-line store.  One winner will be from only those entries that used a Jan's Digi Stamp image and the second from all other entries.  

Finding an image for my card was easy because of the wonderful selection at the Jan's Digi Stamps on-line store.  


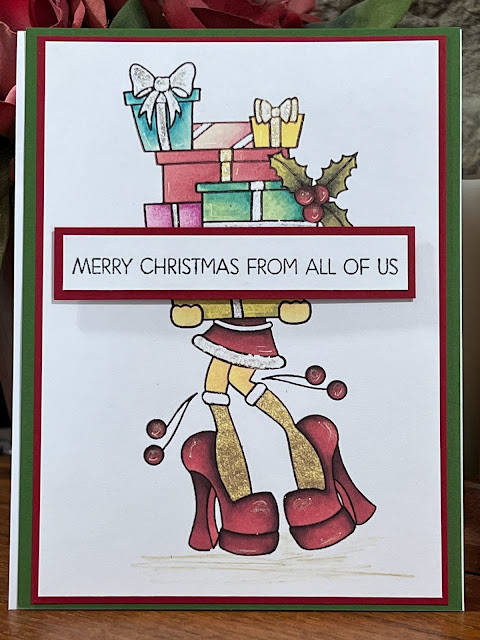
The beauty of this image is that it was already colored.  I took the bouquet from the Floral Flourish set along with a sentiment from the same set.  I printed the flowers using Microsoft Word.  I used my Brother Scan n Cut to cut out the image.  I used a stamp die to cut out the sentiment.  The ovals were cut using a set of oval dies from Elizabeth Crafts.  All the paper was pulled from my stash of scraps.  

I hope you take the time to go look at Jan's Digi Stamps, she's got some great images and the pre colored images are great if you are pressed for time, but want to give someone a hand made card.  They are also great for scrapbooking projects.  Hmmm....  That gives me an idea.  

Here are some affiliate links to the products I used.  A little for me, but cost nothing for you.  :-)

Have a great day, eat some chocolate and be kind to everyone.

April

Thursday, March 11, 2021

Happy Birthday Challenge at Creative Knockouts Challenge Blog

It is Thursday and that means it is time for a new challenge at the Creative Knockouts Challenge Blog.  This week's theme challenge is Happy Birthday.  Our sponsor is Hetty Clare and if you enter you have the chance to win 4 images from the shop.  

I used digi stamp Pre Colored Birthday Cats to create my card.


Happy Birthday Card Recipe

This cute little image was printed on my Kodak printer.  I wish I'd printed it just a little bigger, but the clouds in the background are fun, too.  I used an MFT stencil and Tim Holtz Oxide Ink to create the cloud effect.  I added some splatter also with Tim Holtz Oxide Ink.  I cut out the Hetty Clare image using my Brother Scan n Cut.  I need to figure out how to cut out the holes in the words, but that is for another day
I shaded those holes with the blue cloud ink and called it a day.

Here are some affiliate links for products I used for this card.  No cost to you, but I get a small commission if you purchase a product through this link: 

Tim Holtz Oxide Inks:


Scotch ATG Gun:


Scotch ATG Refills:


Fiskars Trimmer:


Join us for the Happy Birthday Challenge and enter your card to win.

Have a great day and enjoy the journey , eat some chocolate and be kind to everyone.

April


Saturday, March 6, 2021

Cards 4 Boys at Send a Smile 4 Kids Challenge Blog

It's the 1st Saturday of the month and that means it is time for another challenge at the Send a Smile 4 Kids Challenge Blog.  The theme for this challenge is Cards 4 Boys or Anything Goes 4 Kids.  This challenge no longer has sponsors so you will be participating for pride not prize.

Send a Smile 4 Kids charity is dedicated to collecting and distributing handmade cards to children who are inpatient at Children's Hospitals.  Please send us your handmade kids' cards for holidays, birthdays, and everyday cheer.  Help us put a smile on our kids' faces.


Cards 4 Boys Card Recipe

When it comes to masculine cards I struggle.  I don't know why I struggle, but I do.  I think part of my struggle comes with asking my husband if this card is a guy card and he answers - not really.  LOL. I like sequins and glitter and pink and splatter (of course).  So I was talking to Dee and she said you can't go wrong with balloons because everyone likes balloons.  She even shared her design idea with me and so was created my Make a Wish balloon card 4 boys.  I chose watercolor paper (very close to splatter) and cut out circles.  Yes circles.  The bottom of the balloon is where I cut the corner of the card stock at an angle.  I inked the edges although I don't know if you can tell.  I stacked the balloons on top of one another so I didn't lose my arrangement.  Don't do this the way I did.  If I did it again, I would only die cut the top balloon.  Once I put adhesive on the balloons, the stack of paper was thick and my die cut didn't go all the way through.  I had to pull apart the balloons and just trust me when I say - die cut only the top balloon.  I die cut the Stamplorations 'Make a Wish' die once out of the pattern paper and twice out of white card stock.  I glued the 3 together and put the make a wish back where I die cut it in the balloon.  I placed them on the card front and turned the card front over so I could mark where I need to trim the balloons.  I trimmed, adhered the balloons and balloon bottoms to the card and added the twine.  I then took some Tim Holtz Oxide Ink and inked around the balloon very very very lightly.

Thanks for stopping by the blog today.  Consider entering our challenge and donating your hand made cards to our great charity.

You can find the Make a Wish die here:  https://stamplorations.com/search?q=make%20a%20wish
Stamplorations is a one woman owned business and she is a pleasure to work with.  She also makes beautiful stamps, dies and stencils.

Here are some affiliate links to the products I used.  It doesn't cost you a thing, but I get a small commission which helps me purchase my crafting supplies.  


Have a great day, eat some chocolate and be kind to everyone.

April

Thursday, March 4, 2021

It Is Back to Quilting Basics with the Four Patch Block and Some F*R*I*E*N*D*S Fabric

 I have some fun 'FRIENDS' (yes the TV show) fabric that I wanted to turn into a quilt.  There was only one problem.  2 of the fabrics were directional.  Now this shouldn't seem like a problem, but finding a quilt pattern that is conducive to multiple directional prints was more challenging than I thought.  I couldn't find any of the 3 yard quilt patterns that I thought would work easily.  Then I had a light bulb in my brain go on and it was time to go back to basics.  The four patch block with a standard block pattern was just the ticket.

Here is the result:


The Final Quilt Top


The Pattern (Each Block is 9 1/2")


Check out my video for the tutorial if you have some fabric you want to use to make a simple 4 patch quilt.


Thank you for watching.  Like, subscribe and share with your friends.  :-)

Thanks,
April


Wednesday, March 3, 2021

Anything Goes on Jan's Digi Stamp Challenges

 It is the 1st of the month and that means another challenge on Jan's Digi Stamp Challenges Blog.  Always anything goes means lot of fun and creativity.  Two lucky winners will be awarded a $10 Gift Code to the on-line store.  One winner will be from only those entries that used a Jan's Digi Stamp image and the second from all other entries.  

Finding an image for my card was easy because of the wonderful selection at the Jan's Digi Stamps on-line store.  


The beauty of this image is that it was already colored.  I took the lily from the Easter Blessings set along with a sentiment from the same set.  I printed the flowers using Microsoft Word.  I used my Brother Scan n Cut to cut out the image.  I used a tag die from My Favorite Things to cut out the sentiment.  The ovals were cut using a set of oval dies from Elizabeth Crafts.  All the paper was pulled from my stash of scraps.  The sequins were added last for a little dimension.  I inked around the edges of everything to give it a more finished look.  I also rounded the corners using a We R Memory Keepers chomper.  

I hope you take the time to go look at Jan's Digi Stamps, she's got some great images and the pre colored images are great if you are pressed for time, but want to give someone a hand made card.  They are also great for scrapbooking projects.  Hmmm....  That gives me an idea.  

Here are some affiliate links to the products I used.  A little for me, but cost nothing for you.  :-)

Have a great day, eat some chocolate and be kind to everyone.

April

Time to Be Merry Challenge at Creative Knockouts

It is Thursday and that means it is time for a new challenge at the  Creative Knockouts Challenge Blog .  This week's theme challenge i...